
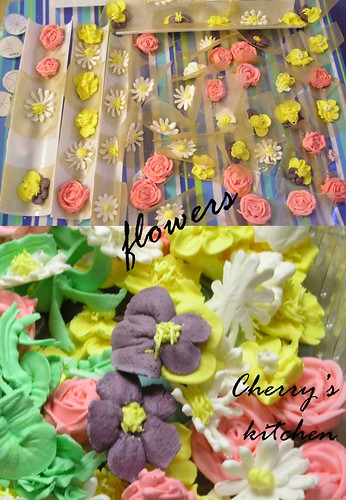
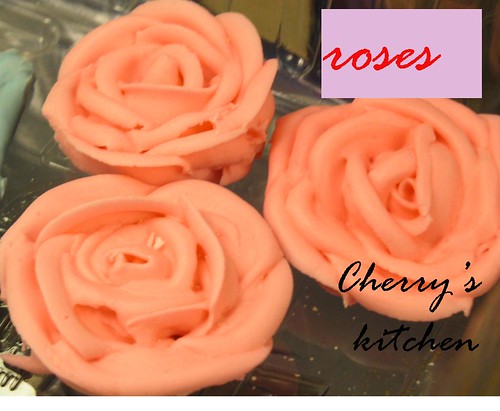
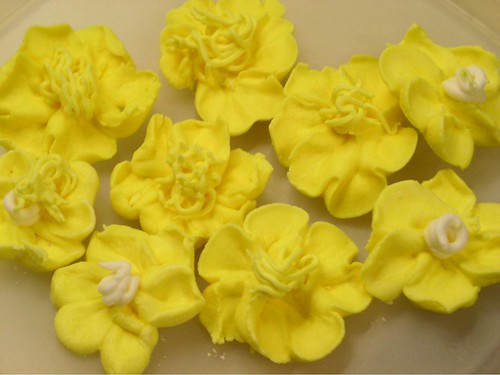
Tips: 12 for base and 104 or 97 for petal.
Base: Hold bag at 90 angle with tip 12 and slightly above the center of the nail. Squeese with heavy pressure. Ease pressure as you raise tip up, narrowing base to a pyramid shape. (base should be 1 1/2 times the length of the opening of tip 97 or 104.)
Center: Hold bag at 45 angle and with wide end of tip 104, follow top of base and narrow and angled in slightly. Do 3 things simultaneously: squeese, pull tip up and away from top, stretching icing into a ribbon as you spin the nail to the end of the finger. Relax pressure as you bring ribbon of icing around the top, overlapping the point which you start.
Top row petals: Touch wide end of tip to mid-point of base, narrow and straight up. Spin nail and move tip up and back to midpoint of base forming first petal of rose ( yes, you did one petal!) Start again, slightly behind end of each petal and squeese out second petal. Repeat for third petal. Rotate the nail 1/2 turn for each petal.
Middle row petals: Touch wide end of tip slightly below the center of petal in top row. Angle narrow end of tip out slightly more. Squeese bag and spin nail moving tip up, then down to form first petal. Repeat- do 5 petals.
Bottom row petals: Same as above but do 7 petals.
****As the rows increase, the bag should be angled even more.
***Spin the nail as the arch is being made.
***Wide angle of the tip should be at the bottom.
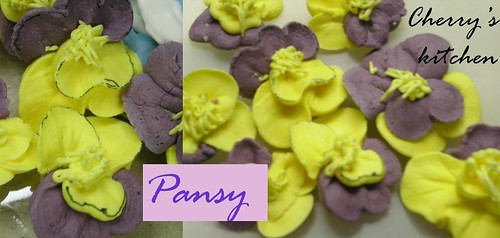
Tips 104, 1
Move tip 104 out to the edge of the nail to form first covered petal. Wide angled tip is inside. Spin nail, letting the spin of nail form petal. Relax pressure as you move back to starting point. Stop. Lift away. Repeat for second petal. Thse two yellow petal should cover half of the nail.
Add a single ruffled petal using a gentle back and forth motion to create a ruffled effect.
Add 2 shorter curved petals on top of first 2 curved petals.
Add Tip 1 teardrop shapped loop center. Dry in medium flower formers.
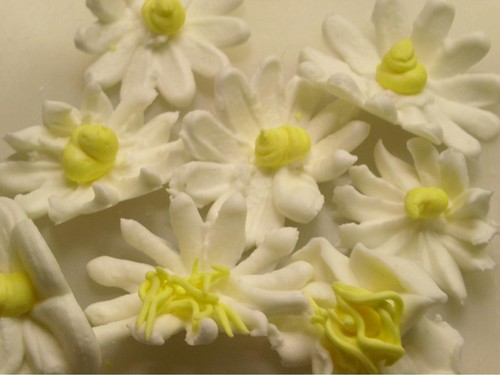
Tips: 104, 5 or 233 (gives the wavy look)
Position tip 104 almost parallel to the nail. Wide end out would form a flatter petal while narrow end out would form a raised petal. Squeese bag with even pressure. Repeat for a total of 12 petals. Add tip 5 or 233 to the center dot. For the textured look of the daisy center, dampen finger in crushed cake sparkles, then press on center. Dry in medium flower formers.
Tios: 104, 3,1
Using steady pressure, move tip 104 to edge of nail. Spin nail to the end of the finger, letting the spin of the nail form the petal. Relax pressure, move tip back to starting point. Stop, lift tip away. Repeat for 5 more petals. Edges should be cupped slightly. Pinch using fingers dipped in cornstarch or icing sugar.
Center: Pipe tip 3 dot in the center of the flower. Then move in circular motion, pipping an open coil flower center, making sure the base of the coil is narrower than the top, like a tornado shape. Stop, lift away. When turning nail, add tip 1 zigzag trim to top edge of coil. Dry in medium flower former.
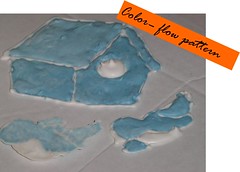
Color-Flow: This is a class work that practices the technique of Filling in.
Firstly, outline the bird with full strength color flow icing followed by filling in with the blue icing.
Recipe for Color flow icing:
1/4 cups water,
4 cups sifted confectioner's sugar,
2 T Wilton color flow mix.
Directions:
Blend all ingredients on low speed for 5 mins.
*Color flow "crusts" easily so keep it covered with a damp cloth while using.
*This recipe makes 2 cups + 2 T full strength icing.
*To soften icing or thin icing for filling in,add 1/2 t water per 1/4 c icing.
*Color flow is ready for filling in outlines when a small amount dropped back into the mixture takes a count of 10 to disappear.
*Stir in colors as desired.
*Dried color flow fade slightly when exposed to bright sunligh so keep theme covered until cake is ready to assemble.
2 comments:
hi cherry
i really admire ur lovely receipes
i want to know from where i van find the on line receipes for decorating on cake
hope u answer it
and also i have visited ur country 6 month ago its really beautiful congratulations!
Very nice! I like the way yours came out. That Wilton Class was fun for me. My cake turned out pretty good. I have a lot of pictures on my blog http://bakingdecorations.com/decorating/wilton-course-2-class-2/
Thanks.
Post a Comment